What you need to know (based on the AQA specification)
What you need to know (based on the AQA specification)
- The principles and limitations of optical microscopes, transmission electron microscopes and scanning electron microscopes.
- Measuring the size of an object viewed with an optical microscope. The difference between magnification and resolution.
- Use of the formula: magnification = size of image / size of real object.
- Principles of cell fractionation and ultracentrifugation as used to separate cell components.
- Students should be able to appreciate that there was a considerable period of time during which the scientific community distinguished between artefacts and cell organelles.
Magnification and Resolution
Microscopes are used to study the structure of cells and their organelles. They all rely on two key principles:
- Magnification — how many times bigger an image is than the real object
- Resolution — the ability to distinguish between two points that are close together. This is determined by the wavelength used — a shorter wavelength gives higher resolution; a longer wavelength gives lower resolution.
Different types of microscope use different sources — light or electrons — and this affects how much detail they can show.
What does wavelength mean — and why does it matter for resolution?
Wavelength is the distance between two peaks of a wave (like the distance between two ripples on water).
- Light has a relatively long wavelength (~400–700 nm)
- Electrons behave like waves too — but with a much shorter wavelength (~0.005 nm)
A microscope can only see two objects as separate points if they are further apart than the wavelength of the wave used. Two objects closer together than the wavelength blur into a single point.
Because electrons have a wavelength about 100,000 times shorter than light, an electron microscope can resolve objects that much smaller — which is why we can see organelles, ribosomes and even viruses using electron microscopes, but not light microscopes.

Don't confuse magnification with resolution
You can magnify an image as much as you want, but if the wavelength is too long, two close objects will still appear as one blurred point.
Magnification Formula
$$ \text{Magnification} = \frac{\text{size of image}}{\text{size of real object}} $$
Rearranged:
- Real size = image size ÷ magnification
- Image size = real size × magnification
Exam tip — unit conversions
Most magnification questions involve converting between units. Get the image and real size into the same units before dividing.
- 1 cm = 10 mm
- 1 mm = 1000 μm
- 1 μm = 1000 nm
Memorise: 1 mm = 1000 μm (a common mistake is dividing by 100 instead of 1000).
Practice — Magnification Calculations
Use the image below to work out each question. The image size of each feature is shown directly on the diagram. Click Show working to reveal the step-by-step solution.

Worked example: real size of the nucleus
From the diagram:
- Image size of the nucleus = 20 mm
- Magnification = × 2000
Find: the real size of the nucleus in μm.
Show working
Step 1 — convert image size to μm: 20 mm × 1000 = 20,000 μm
Step 2 — apply the formula: Real size = image size ÷ magnification = 20,000 ÷ 2000 = 10 μm
Practice 1: real size of the chloroplast
From the diagram:
- Image size of the chloroplast = 14 mm
- Magnification = × 2000
Find: the real size of the chloroplast in μm.
Show working
Step 1 — convert image size to μm: 14 mm × 1000 = 14,000 μm
Step 2 — apply the formula: Real size = image size ÷ magnification = 14,000 ÷ 2000 = 7 μm
Practice 2: find the magnification (mitochondrion)
From the diagram:
- Image size of the mitochondrion = 5 mm
- Real size of the mitochondrion = 2 μm
Find: the magnification of the image.
Show working
Step 1 — get both values into the same unit: Convert 5 mm → μm: 5 × 1000 = 5000 μm
Step 2 — apply the formula: Magnification = image size ÷ real size = 5000 ÷ 2 = × 2500
Types of Microscope
There are two main types of microscope used to study cells: optical (light) and electron. Electron microscopes are further split into two types: TEM and SEM.
Optical (Light) Microscope
- Uses light to form the image
- Wavelength is long (longer than that of electrons)
- Maximum resolution ≈ 0.2 μm — anything smaller than this cannot be seen as a separate structure
- Cannot see ribosomes, ER or lysosomes (all smaller than 0.2 μm)
- Can see the nucleus and sometimes mitochondria (no internal detail)
- Maximum magnification ≈ × 1500
- Can be used to view living cells in colour
Electron Microscope
- Uses a beam of electrons to form the image
- Wavelength of electrons is much shorter than light → much higher resolution
- Higher resolution and magnification than optical microscopes
- Specimens must be in a vacuum, so cells are dead (no living cells)
Transmission Electron Microscope (TEM)
- Uses electromagnets to focus a beam of electrons that is transmitted through the specimen
- Denser parts of the specimen absorb more electrons → appear darker in the image
- Produces 2D images
- Higher resolution than SEM → shows the internal structure of organelles (e.g. cristae in mitochondria, thylakoids in chloroplasts)
- Limitation: requires thin specimens
Scanning Electron Microscope (SEM)
- A beam of electrons is scanned across the surface of the specimen
- Reflected/scattered electrons are detected to build up an image
- Produces 3D images showing the surface of the specimen
- Can use thicker specimens than TEM
- Lower resolution than TEM
Compare the three microscopes
Test yourself — click a button to reveal that column.
| Feature | Optical | TEM | SEM |
|---|---|---|---|
| Source | Light | Beam of electrons (transmitted through) | Beam of electrons (scanned across surface) |
| Resolution | Low (~0.2 μm) | Very high (~0.2 nm) — about 1000× better than optical | High (~10 nm) — lower than TEM but still much better than optical |
| Max magnification | Low (× 1500) | Very high (× 500,000+) — about 300× more than optical | High (× 100,000+) — lower than TEM but still far higher than optical |
| Image | 2D, in colour | 2D, black & white | 3D, black & white |
| Specimen | Living or dead | Dead (must be in vacuum), thin | Dead (must be in vacuum), can be thicker |
| Best for seeing | Whole cells, nucleus (no internal detail) | Internal structure of organelles (cristae, thylakoids) | Surface of specimens (e.g. pollen, whole cells) |
Cell Fractionation
Cell fractionation breaks open cells and separates their organelles so each type can be studied individually. There are two main stages: homogenisation & filtration, then ultracentrifugation.
Before any of these steps begin, the cells are placed in a solution that must be:
- Ice-cold — to reduce the activity of hydrolytic enzymes that would damage the organelles
- Isotonic — the same water potential as the organelles, preventing osmotic damage (organelles shrinking or bursting)
- Buffered — to maintain a constant pH so enzymes and proteins are not denatured

1. Homogenisation and Filtration
The cells are vibrated or ground in a blender. This breaks open the cell-surface membrane and releases the organelles into the solution.
The mixture is then filtered through a gauze to remove large debris such as connective tissue and unbroken cells. The organelles pass through, leaving a filtrate that contains the mixture of organelles ready for separation.
2. Ultracentrifugation
The filtrate is spun in a centrifuge at increasing speeds to separate the organelles by density (heaviest first):
- The filtrate is poured into a tube and spun at a low speed.
- The heaviest organelles (e.g. nuclei) move to the bottom of the tube, forming a pellet.
- The remaining organelles stay suspended in the liquid above — called the supernatant.
- The supernatant is drained into a new tube and spun at a higher speed, repeating the process.
- This continues at progressively higher speeds until each type of organelle has been separated.
Order of pelleting (heaviest to lightest): nuclei → chloroplasts → mitochondria → lysosomes → endoplasmic reticulum → ribosomes.

Exam tip — explaining the conditions
A common 6-mark question asks why the solution must be cold, isotonic and buffered. Be specific:
- Cold → reduces enzyme activity (don’t just say “preserves the cells”)
- Isotonic → prevents osmotic damage to organelles (don’t confuse with whole-cell osmosis)
- Buffered → maintains pH so proteins / enzymes aren’t denatured
Identifying Starch Grains
Practical context
Practical context
Students could use iodine in potassium iodide solution to identify starch grains in plant cells.
A common required-practical activity for studying plant cells under an optical microscope:
- Place a thin section of plant tissue on a slide
- Add a drop of iodine in potassium iodide solution
- Cover with a coverslip and view under the optical microscope
- Starch grains turn blue-black — they show up clearly against the rest of the cell
Artefacts vs Organelles
An artefact is a structure seen in a microscope image that is not actually part of the real cell — e.g. air bubbles, distortion or debris from preparing the specimen.
For a long time, scientists couldn’t tell which small structures were real organelles and which were artefacts. As new techniques developed (especially the electron microscope), images became clearer and more reproducible — letting the scientific community confirm which structures were real (e.g. mitochondria, ER) and rule out artefacts.
Exam Question Practice
Describe and explain how you would use cell fractionation and ultracentrifugation to obtain a sample of nuclei from muscle tissue.
(6 marks)Hint
Think about why each property of the solution matters (cold, isotonic, buffered). For centrifugation, which organelles settle first and why?
Mark Scheme
- Homogenise the tissue to break open cells and release organelles / nuclei (1 mark)
- Filter to remove intact tissue / cells / debris (1 mark)
- Cold solution to reduce enzyme activity (1 mark)
- Solution with equivalent water potential (isotonic) to prevent osmosis — stops the organelles bursting or shrinking (1 mark)
- Buffered solution to stop enzymes / proteins denaturing (1 mark)
- Centrifuge at a low(er) speed so nuclei form a pellet at the bottom; supernatant is discarded (1 mark)
The scientists broke open cells to produce a suspension of cell contents.
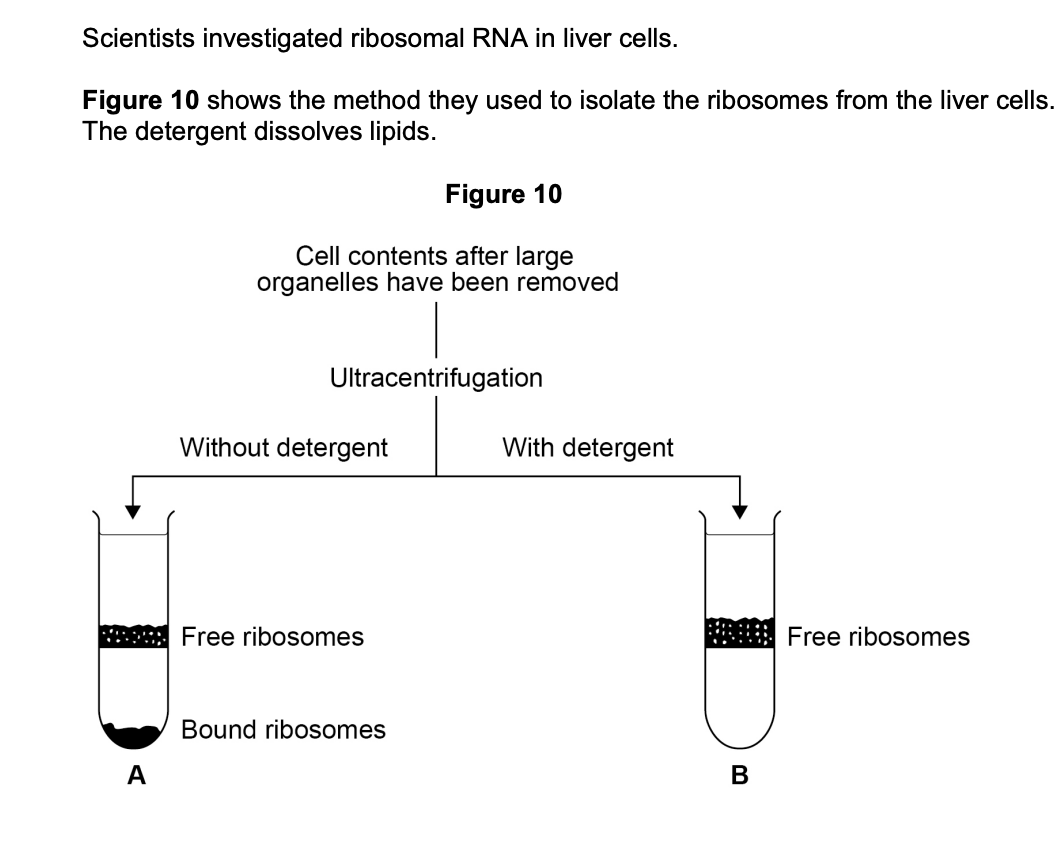
(a) Describe how the scientists would remove large organelles from this suspension of cell contents. (2 marks)
(b) Explain the position of the bands of ribosomes in tubes A and B in Figure 10. (3 marks)
(5 marks)Mark Scheme
(a) — 2 marks
- Use centrifugation at slow / low / increasing (sequence of) speeds (1 mark)
- Large / dense organelles end up in the pellet at the bottom; smaller organelles (e.g. ribosomes) stay in the supernatant (1 mark)
(b) — 3 marks
- (Tube A) Ribosomes are bound to rough endoplasmic reticulum (1 mark)
- The bound ribosomes are denser / heavier, so they move further (lower band) (1 mark)
- (Tube B) Only free ribosomes are present because the membrane / phospholipids / ER have been dissolved by the detergent — these free ribosomes are lighter, so form a band higher in the tube (1 mark)
Comments from mark scheme
- Part (a): don’t just describe filtration — that’s a separate step (removes cell debris, not organelles)
- Part (a): dense / heavy organelles form a pellet at the bottom, lighter material stays in the supernatant above
- Part (b): “ER” / “rER” is only credited if “endoplasmic reticulum” has been written out first
- Part (b): accept “denser / less dense” for “heavier / lighter”; accept “settle lower” / “in pellet” for “move further”
- Part (b): “broken down” is accepted for “dissolved”; ignore “damaged”
Comments from mark scheme